Showing posts with label Halloween. Show all posts

Sunday, October 31, 2010

Happy Halloween & Last Minute Costumes

Happy Halloween!
Perry loves dressing up.

Looking for a quick, easy, last minute costume that won't break the bank? How about looking through old magazines, I found Rolling Stone is best for this, and cutting out head sized covers. Using a pair of scissors cut out the face, and the eyes...cause you'll want to see right? Then using some elastic or rubber bands punch two small holes in the sides of the "mask" and make it to fit your head before tying a knot in each end.

Look at Bruce and Mr. Penn having a great time!

My turn as Shawn Penn, and a chance to creep my brother out.

Another last minute idea is from the goddess of Halloween crafting, Martha Stewart. I saw this idea the other day on her show to create a simple ribcage t-shirt for a fast costume. Instructions and the template are on her website.

Saturday, October 30, 2010

Halloween Shakers


I know it's the day before Halloween, but I just had to post this finished project. I hope it gives you some inspiration to create for next Halloween...or this Halloween, if you're right fast at whipping up craft projects!

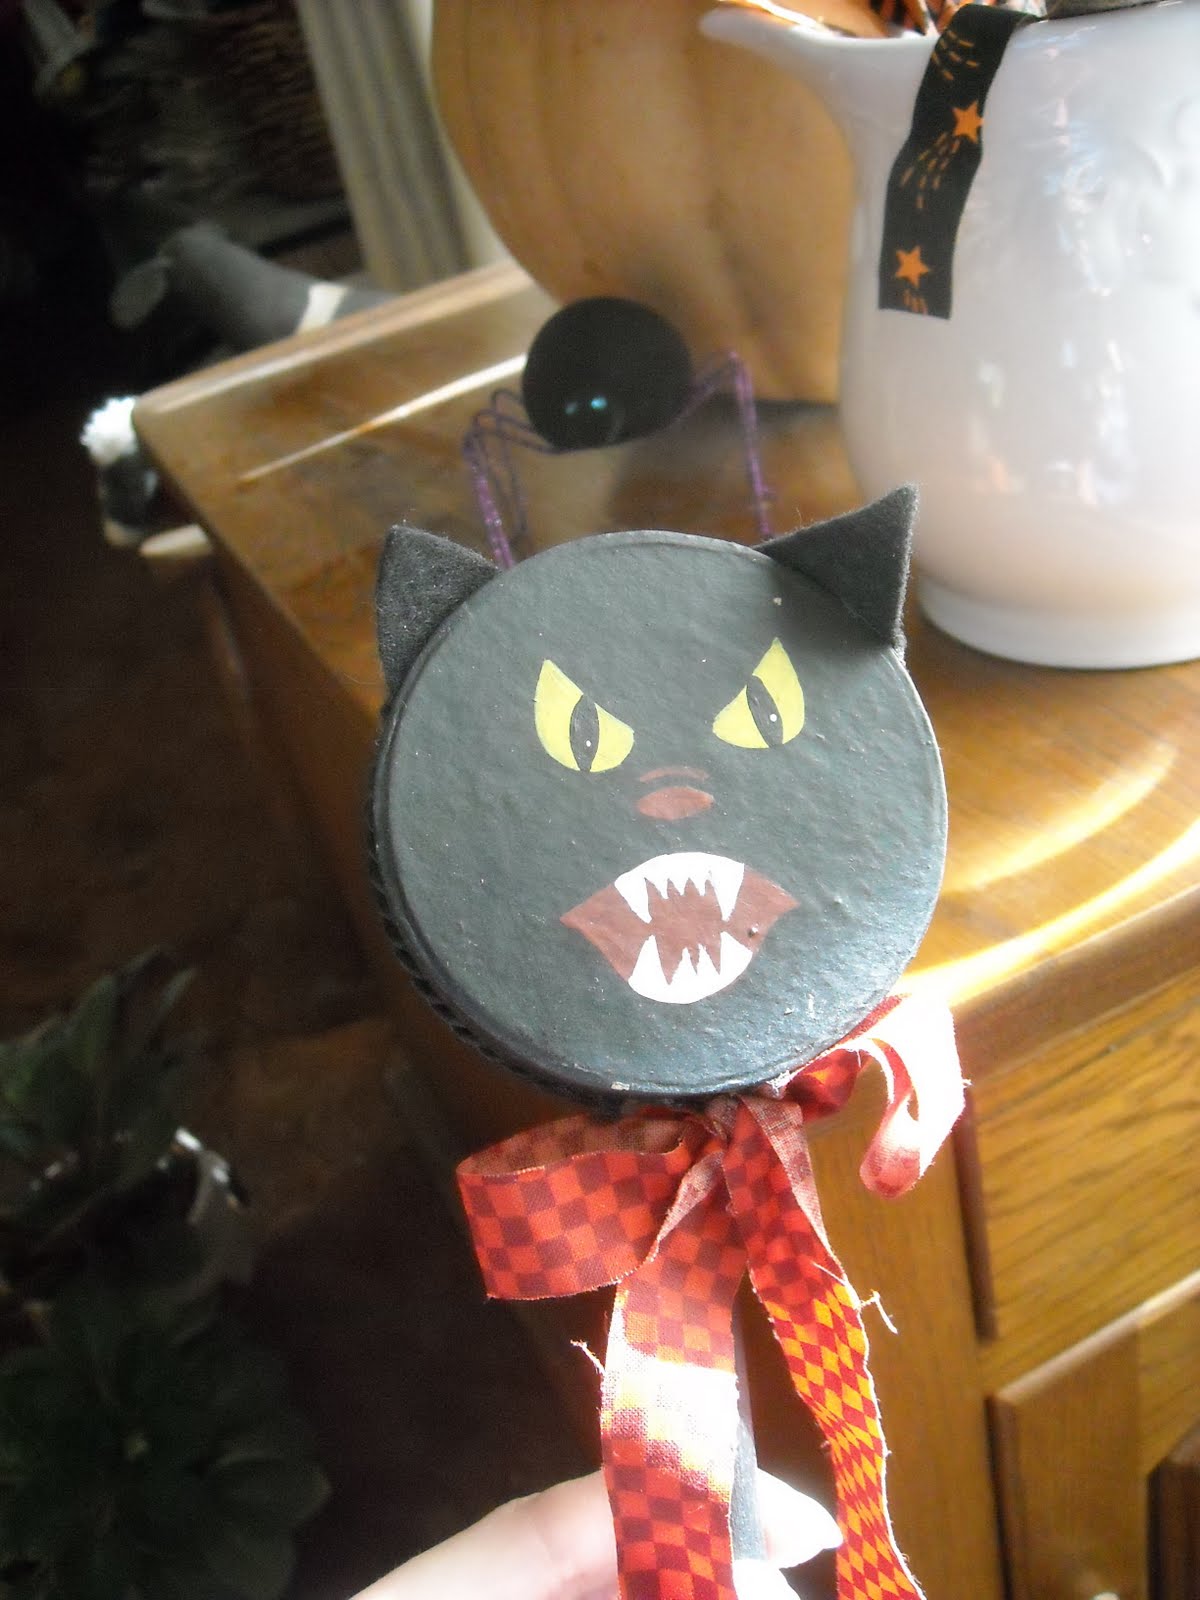
These shakers are made in the style of Victorian Halloween noisemakers, made from simple and very inexpensive round paper-mache boxes, uncooked rice(for inside the box), wooden dowels, some decorative trim, a hot glue gun, fabric, and acrylic paint. Painting the faces on these is really the time consuming part. Look for inspiration for these in old Victorian Halloween decor and pictures, and Halloween folk art.
They kind of look like candy, don't they! :)


Pom-pom trim slightly aged on all the pumpkins.


Decorative braided trim glued around the edge.

Black felt ears.


Strips of Halloweeny fabric tied in bows around the base of the dowel.

Cheshire Grin

Sunday, October 17, 2010

Halloween Boo-quet


Boo-quet

For Valentine's Day you put red Roses on the table, for Easter, Lilies, Christmas bouquets are almost always Poinsettias, but what kind of a bouquet can you display for Halloween? How about a spooky BOOO-quet of dead flowers, & creepy looking seed pods!

I usually collect unique looking seed pods and dried flowers or seed heads during the fall and preserve them using clear acrylic coat before bringing them in to display or craft with. For Halloween I thought dead small Black Eyed Susans, or the seed heads, and a sprig of some random dried orange colored weed from the yard were perfect for this boo-quet. It was pretty simple, using a hand-held garden clipper I snipped the amount of Black Eyed Susan and unknown orange weed I wanted in my vase and then stuck them in, arranging them as I went, no water needed because they're dead!! Muahahahaha!


The small version of the Black Eyed Susans in my yard.

Of course AFTER I had finished this and uploaded my pictures I decided to take some of that fairly inexpensive fake spider webbing, that you can find at almost any craft or drug store, and drape it around in this arrangement. Then I added a fake plastic spider and voila! a whole new and more festively spooky boo-quet was born! Just too bad I didn't think about it before I photographed and uploaded all my photos. :(

If you want to try this you'll need:
  • Some sort of vase, or vessel for your arrangement.
  • Dried foliage, seed heads or pods, and or live flowers.
  • Clear Acrylic coat for dried things.
  • Fake spider web and fake spiders (optional)
  • Florist's foam, if you want to get fancy.
  • Water of course, if you are using live flowers.
Below are a few pictures from my garden for ideas for another version of a dried foliage boo-quet.
Neato and a little spookyish weed seed pods.

Globe Thistle seed head

Dried Sea Oats.

Martha's version of a boo-quet

If you don't have a yard with any of these things in them, and you don't have any friends or family with any sort of dried fun stuff either in their yards, then try an arrangement with live flowers like the ones above from Martha Stewart. Mums are great for fall arrangements and so are dark colored sunflowers, or how about blood red roses in a black vase? I like it. Pictured below is a lovely and spidery looking purple plant on my deck, & for some reason I am having brain issues right now and can't for the life of me think of it's name... but it would also make a great addition to a live Halloween boo-quet!Purple spider plant that I can't think of name of right now... pretty good caption huh.

Tuesday, October 12, 2010

Halloween Acorns

Halloween Acorns


Last week I was at my Grandma's house, in the back yard, walking around and picking up acorns off the ground that had fallen from her oak tree. I have always loved acorns, and I usually pick up a couple nice ones each fall, stick them up in a box full of naturey things that I'm never quite sure what to do with, and there they sit. Well, this year I was struck with a idea as I picked up these acorns, and so was born the Halloween acorn project! It's a pretty simple project with mostly basic craft supplies: acorns, a few bottles of acrylic paint, paintbrush, and some patience for painting tiny things :)

You'll Need:
  • A bottle of black acrylic paint, and a bottle of orange acrylic paint.
  • A small paint brush
  • Cup for water (I use old yogurt cups)
  • Acorns, how ever many you want to use & any size will work.
  • Acrylic clear coat spray, you can use either shiny or matte, I used matte.
  1. First step is to clean the acorns, I made the mistake of starting to paint a couple and realizing that the fine dirt on them was keeping the paint from sticking.
  2. Squeeze your paint out on a old plate or I usually use an old plastic lid from a butter tub or something similar. Get a cup of water, and start painting!After the first coat of Orange
3.Let the acorns dry completely overnight, then give them another coat of paint. After two coats of paint

4. Let the acorns dry completely again, and then outside in a garage, deck, some other well ventilated space, lay down newspaper and spray one coat of either shiny or matte clear coat on the acorns. I used matte this time, but think I will try shiny next time!

5. After the acorns are dry, you can throw them in a vase, a bowl, or where ever suits you! I got a little fancy with some of my orange acorns and using a black fine tip paint pen I drew tiny little jack-o-lantern faces on.Finished product!

Monday, October 11, 2010

Book Review- Witch Craft


I recently received the new book Witch Craft, Complied by Margaret McGuire and Alicia Kachmar. Witch Craft is a Halloween DIY book with over 25 projects in it, and the cover reads "Wicked Accessories, Creepy-Cute Toys, Magical Treats, and More!" and it does deliver all that and more in it's 96 pages.

This sweet little hardcover book is chalk full of crochet patterns, recipes, plushies, jewelry, and accessories. There is a really nice section in the back of the book about all the "witch crafters" in this book, and even gives the artists blogs and etsy sites. There were even a couple projects in here from a personal favorite of mine, Em and Sprout creator Lindsay Gibson.

I did manage to pick two favorite projects in the book, and trust me, it was hard to chose! My two fav's were the beaded Spider Earrings, and the Fuzzy Bats(the adorable bat on the cover). I promise, if you love Halloween and crafty books as much as I do then this book is a must have.

Saturday, October 9, 2010

In the Halloweeny Spirit!

Yes, that's my eerily lit face behind those pumpkins and lanterns

Even though it's extremely unseasonably warm for October here in NE right now, yesterday it hit 91 degrees, I am starting to scheme for Halloween. I know I've probably mentioned before on here, lord knows I have everywhere else, that Halloween is my favorite holiday, which could be why I own enough Halloween themed craft books and magazines to put Amazon out of business.

I am currently working hard on some scary-cute projects for the up coming holiday, including one to enter in the big Craftzine Halloween crafts contest, so wish me luck! In the meantime though, why don't you check out two of my past spooky(and yummy) Halloween projects/treats! I do ahve to apologize for my older Halloween posts, I had just started blogging, wasn't quite sure how to go about writing down instructions yet, and the pics are from an old shoty 6 mega-pixel digi.

*Crispy Halloween Treats

*Halloween Lanterns


Pssst! Check back next week for some Halloween crafts and fun! :)

Monday, October 20, 2008

SilverCrow Creations

I am definitely not someone you would find wandering around a Wal-Mart, and while I do still occasionally shop at places like Target I try to limit my big box store spending as much as I can on my budget. I have a great love for independent stores, especially ones that sell quirky and one of a kind goods. I have found in the past couple of years that there are some great web stores out there that offer unique products, and SilverCrow Creations is one of those web stores. Loaded with just about anything and everything a person could dream of, they have an awesome bead and charm selection, actual vintage goods, a variety of rubber stamps you won't find anywhere else, and tons of cute and unique gift ideas. I absolutely love shopping on SilverCrow and love that each of my receipts I've received has a hand signed Thank You. So I encourage you to check them out, I promise you won't be sorry you did. SilverCrow has a lot to offer in the way of unique Halloween goodies and Day of the Day too! ..as seen below..


I know I've been slow getting projects and recipes posted, but I've been working hard on some new projects and I have several great projects to post this week, so stay tuned!

Saturday, October 18, 2008

Halloween costumes part 2

Here is another simple costume idea that I wish I had pictures of, sorry people! But I'm sure you can use your imagination right ? Seeing as there is not much interest in the costumes I'm only going to post one. If anybody tries any of the costumes I'd love to hear how you did it, and if you changed it anything, and send me a picture and I'll post it! Same rating system from costumes part 1, I will give each costume a number between one and five, one is super simple and five takes a little bit more effort.

LadyBug:3
-headband
- black chenille stems(pipe cleaners)
-black pom-poms
-a hot glue gun or craft strength glue
-red shirt, sweatshirt, jacket
-black felt or fabric
-glue, hot glue gun
-usual sewing supplies
--Optional: Black pants

I was actually a ladybug one year when I was a kid, although my costume was made by my Mom and was much fancier than this. The part of this costume that will take the most work is the headband, I suggest starting with a black headband but if it's not you can always wrap it with black ribbon and glue it down with a hot glue gun. Take the two black chenille stems and wrap each one around the head band at least once and glue them into place so they don't move around. Let that dry. After the glue dries take the two black pom-pom's and glue them onto the tips of the chenille stems, and let them dry. Now with your black fabric/felt trace two circles (or however many dots you want) using a cereal bowl as a template and a white pencil or tailor's chalk. Cut out the circles and sew, or glue them onto the back of your red shirt or sweatshirt, and you have a simple ladybug costume!

Friday, October 17, 2008

Martha does Halloween


To those of you who hate Martha Stewart, look away! I happen to love Martha, okay maybe I don't love her personally, but I love the people who come up with her super creative and amazing craft projects, and delicious recipes. One of the things Martha does really well is Halloween, and I think her book of Halloween projects is one of the best holiday how-to books of all time. It has great decorating and party ideas, creative costume and face painting how to's, and recipes that are as yummy as they are ghoulish. I highly recommend it to my fellow fall/Halloween lovers, especially if you are throwing a Halloween party. I am strongly encouraging you to stop by the library and check it out, pick it up at your local bookstore, or buy it from Amazon, I can assure you, you will not be disappointed!

Wednesday, October 15, 2008

Easy Halloween costumes part 1

Yesterday I sat down with a pad of paper and a pencil and came up with some ideas for for exceptionally easy to make and low cost costumes Now I'm usually the type that likes extravagant, detailed Halloween costumes, that take hours upon hours of labor. Unfortunately at the moment I neither have the funds or quite the skill of my Mother (she has made all of my extravagant costumes ) to have such a luxury. So I've come up with a few ideas . I wish I had some pictures of these but for now a description will have to do. I've devised a little ranking system to help you out. By every costume description I will give it a number between one and five, one is super simple and five takes a little bit more effort. I'll post more ideas this Saturday.

M&M: 3
-So you'll need a candy colored shirt, sweatshirt, jacket.
-A piece of white felt or fabric, a sewing needle and white thread, or sewing machine of course.
-Scissors, pins the usual sewing things.
--Optional: candy colored face paint and hat.

Who doesn't love this candy! This is both great for kids and adults. If you have a candy colored shirt, hoodie or coat you don't mind sewing an M onto this will be a cinch. If you do not already have a plain shirt/sweatshirt you can find plain tees and such at just about any craft store for pretty cheap. Of course M&M colors are Red, Blue, Green, Brown, Yellow, and Orange. Find a template or stencil for an M&M looking M, or just look at the candies and freehand it onto a white piece of paper, cut it out. pin it onto the white fabric or felt and cut out your M to be stitched on your shirt. Then sew the M onto your shirt, by hand or on a machine. To finish the look you could paint your face, and wear a baseball cap the same color as your shirt, if you wish.

Presidential Candidate: 1
- Suit, dress shirt, tie, or a power suit ladies! Dress shoes.
-A Presidential smile!
--Optional: flag lapel pin

This is a good one since the election is just a couple of days after Halloween. I think this would be an adorable kids costume as well as a humorous adult costume.


Pillar of Salt: 1
-White sheet
-scissors

Okay, this one might sound a little weird but I once got an award for this one when I was a kid at a church Halloween party for stumping the minister. Can you guess what famous pillar of salt I might have been ? Lot's wife in the bible is turned to a pillar of salt upon looking back at the cities of Sodom and Gomorrah being destroyed by God (Genesis). If you do happen to have a church going's on for Halloween this will be great. You can cut a hole, or a slit for the eyes so you can see, if this is going to be worn all night.

Thursday, October 9, 2008

Crispy Halloween treats!

This is a recipe and how-to for Halloween tortilla crisps. They are very inexpensive, fun, and easy to make, not to mention very yummy! This recipe calls for:

-10 six inch flour tortillas
-1/4 cup melted butter
-1/2 cup sugar
-1/2 teaspoon cinnamon
-a cookie sheet ( I used more than one)
-cookie cutters in Halloween shapes, or a template traced onto wax paper, cut out the pattern and use kitchen scissors to cut out the shapes from the tortillas.

- Heat oven to 350 degrees. Melt butter, put into bowl with basting brush. Mix cinnamon and sugar together, put into a bowl.

Using cookie cutters, or a template begin cutting your shapes out of the tortilla's, depending on the size of your cookie cutter you should be able to get several out of one tortilla. You can use the scraps too, they won't be as pretty but they'll taste as good!


After shapes are cut out, brush melted butter onto both sides, then sprinkle one side with cinnamon sugar mixture. I recommend doing this on a cooling rack over a plate, it's less messy and you can reuse the cinnamon sugar that falls onto the plate.


Place shapes onto cookie sheet(s) and bake for 8-10 minutes. Cool for about 15 minutes. Give them away as a Halloween treat to family and friends, or keep them for yourself to enjoy!

Wednesday, October 8, 2008

Halloween Lanterns


These are Halloween lanterns, or luminaries some call them, made out of soup cans and coffee cans...if you can find any tin coffee cans since they're gone to plastic. They look great out among the Jack-o-Lanterns on All Hallow's Eve, lining the walkway to your house, or even in a window. You'll have to excuse my poor excuse for a picture, but I don't have the best digital camera. For my lanterns I used one small, I suppose you'd call it standard size soup can, and two larger, coffee cans. You will also need a hammer, an awl, a towel or bag of rice, and spray paint or oil-based enamel paint. Here's the how to-


1. Start by taking the label off the empty can and cleaning it out well.

2. This is the time to draw a pattern on the can if you wish with a marker, or you can freehand it later.

3. Fill can with water and and put in the freezer to well... freeze! This is so the can is easier to work with and won't collapse while you are punching it full of holes.

4. After a day or so, ( I think mine took about that long to completely freeze) take can out of the freezer , steady the can on a towel, or a bag of rice, and begin punching holes in the can with the hammer and awl.

5. After you are finished place the can in the sink, let the ice melt and the water drain out. Dry the can.

6. Paint the outside of the can if you wish with spray paint or oil-based enamel paint, I chose to use spray paint for mine. If the holes in the can get blocked with paint, clear those holes with a toothpick while the paint is still wet. I painted the inside of my cans yellow as well to help reflect the light from the candles inside.

7. Add a candle, or those new battery operated flame less candles and enjoy your new Halloween lanterns!