Sunday, October 31, 2010

Happy Halloween & Last Minute Costumes

Happy Halloween!
Perry loves dressing up.

Looking for a quick, easy, last minute costume that won't break the bank? How about looking through old magazines, I found Rolling Stone is best for this, and cutting out head sized covers. Using a pair of scissors cut out the face, and the eyes...cause you'll want to see right? Then using some elastic or rubber bands punch two small holes in the sides of the "mask" and make it to fit your head before tying a knot in each end.

Look at Bruce and Mr. Penn having a great time!

My turn as Shawn Penn, and a chance to creep my brother out.

Another last minute idea is from the goddess of Halloween crafting, Martha Stewart. I saw this idea the other day on her show to create a simple ribcage t-shirt for a fast costume. Instructions and the template are on her website.

Saturday, October 30, 2010

Halloween Shakers


I know it's the day before Halloween, but I just had to post this finished project. I hope it gives you some inspiration to create for next Halloween...or this Halloween, if you're right fast at whipping up craft projects!

These shakers are made in the style of Victorian Halloween noisemakers, made from simple and very inexpensive round paper-mache boxes, uncooked rice(for inside the box), wooden dowels, some decorative trim, a hot glue gun, fabric, and acrylic paint. Painting the faces on these is really the time consuming part. Look for inspiration for these in old Victorian Halloween decor and pictures, and Halloween folk art.
They kind of look like candy, don't they! :)


Pom-pom trim slightly aged on all the pumpkins.


Decorative braided trim glued around the edge.

Black felt ears.


Strips of Halloweeny fabric tied in bows around the base of the dowel.

Cheshire Grin

Sunday, October 17, 2010

Halloween Boo-quet


Boo-quet

For Valentine's Day you put red Roses on the table, for Easter, Lilies, Christmas bouquets are almost always Poinsettias, but what kind of a bouquet can you display for Halloween? How about a spooky BOOO-quet of dead flowers, & creepy looking seed pods!

I usually collect unique looking seed pods and dried flowers or seed heads during the fall and preserve them using clear acrylic coat before bringing them in to display or craft with. For Halloween I thought dead small Black Eyed Susans, or the seed heads, and a sprig of some random dried orange colored weed from the yard were perfect for this boo-quet. It was pretty simple, using a hand-held garden clipper I snipped the amount of Black Eyed Susan and unknown orange weed I wanted in my vase and then stuck them in, arranging them as I went, no water needed because they're dead!! Muahahahaha!


The small version of the Black Eyed Susans in my yard.

Of course AFTER I had finished this and uploaded my pictures I decided to take some of that fairly inexpensive fake spider webbing, that you can find at almost any craft or drug store, and drape it around in this arrangement. Then I added a fake plastic spider and voila! a whole new and more festively spooky boo-quet was born! Just too bad I didn't think about it before I photographed and uploaded all my photos. :(

If you want to try this you'll need:
  • Some sort of vase, or vessel for your arrangement.
  • Dried foliage, seed heads or pods, and or live flowers.
  • Clear Acrylic coat for dried things.
  • Fake spider web and fake spiders (optional)
  • Florist's foam, if you want to get fancy.
  • Water of course, if you are using live flowers.
Below are a few pictures from my garden for ideas for another version of a dried foliage boo-quet.
Neato and a little spookyish weed seed pods.

Globe Thistle seed head

Dried Sea Oats.

Martha's version of a boo-quet

If you don't have a yard with any of these things in them, and you don't have any friends or family with any sort of dried fun stuff either in their yards, then try an arrangement with live flowers like the ones above from Martha Stewart. Mums are great for fall arrangements and so are dark colored sunflowers, or how about blood red roses in a black vase? I like it. Pictured below is a lovely and spidery looking purple plant on my deck, & for some reason I am having brain issues right now and can't for the life of me think of it's name... but it would also make a great addition to a live Halloween boo-quet!Purple spider plant that I can't think of name of right now... pretty good caption huh.

Tuesday, October 12, 2010

Halloween Acorns

Halloween Acorns


Last week I was at my Grandma's house, in the back yard, walking around and picking up acorns off the ground that had fallen from her oak tree. I have always loved acorns, and I usually pick up a couple nice ones each fall, stick them up in a box full of naturey things that I'm never quite sure what to do with, and there they sit. Well, this year I was struck with a idea as I picked up these acorns, and so was born the Halloween acorn project! It's a pretty simple project with mostly basic craft supplies: acorns, a few bottles of acrylic paint, paintbrush, and some patience for painting tiny things :)

You'll Need:
  • A bottle of black acrylic paint, and a bottle of orange acrylic paint.
  • A small paint brush
  • Cup for water (I use old yogurt cups)
  • Acorns, how ever many you want to use & any size will work.
  • Acrylic clear coat spray, you can use either shiny or matte, I used matte.
  1. First step is to clean the acorns, I made the mistake of starting to paint a couple and realizing that the fine dirt on them was keeping the paint from sticking.
  2. Squeeze your paint out on a old plate or I usually use an old plastic lid from a butter tub or something similar. Get a cup of water, and start painting!After the first coat of Orange
3.Let the acorns dry completely overnight, then give them another coat of paint. After two coats of paint

4. Let the acorns dry completely again, and then outside in a garage, deck, some other well ventilated space, lay down newspaper and spray one coat of either shiny or matte clear coat on the acorns. I used matte this time, but think I will try shiny next time!

5. After the acorns are dry, you can throw them in a vase, a bowl, or where ever suits you! I got a little fancy with some of my orange acorns and using a black fine tip paint pen I drew tiny little jack-o-lantern faces on.Finished product!

Monday, October 11, 2010

Book Review- Witch Craft


I recently received the new book Witch Craft, Complied by Margaret McGuire and Alicia Kachmar. Witch Craft is a Halloween DIY book with over 25 projects in it, and the cover reads "Wicked Accessories, Creepy-Cute Toys, Magical Treats, and More!" and it does deliver all that and more in it's 96 pages.

This sweet little hardcover book is chalk full of crochet patterns, recipes, plushies, jewelry, and accessories. There is a really nice section in the back of the book about all the "witch crafters" in this book, and even gives the artists blogs and etsy sites. There were even a couple projects in here from a personal favorite of mine, Em and Sprout creator Lindsay Gibson.

I did manage to pick two favorite projects in the book, and trust me, it was hard to chose! My two fav's were the beaded Spider Earrings, and the Fuzzy Bats(the adorable bat on the cover). I promise, if you love Halloween and crafty books as much as I do then this book is a must have.

Saturday, October 9, 2010

In the Halloweeny Spirit!

Yes, that's my eerily lit face behind those pumpkins and lanterns

Even though it's extremely unseasonably warm for October here in NE right now, yesterday it hit 91 degrees, I am starting to scheme for Halloween. I know I've probably mentioned before on here, lord knows I have everywhere else, that Halloween is my favorite holiday, which could be why I own enough Halloween themed craft books and magazines to put Amazon out of business.

I am currently working hard on some scary-cute projects for the up coming holiday, including one to enter in the big Craftzine Halloween crafts contest, so wish me luck! In the meantime though, why don't you check out two of my past spooky(and yummy) Halloween projects/treats! I do ahve to apologize for my older Halloween posts, I had just started blogging, wasn't quite sure how to go about writing down instructions yet, and the pics are from an old shoty 6 mega-pixel digi.

*Crispy Halloween Treats

*Halloween Lanterns


Pssst! Check back next week for some Halloween crafts and fun! :)

Thursday, October 7, 2010

SnapDRAGONS!


I decided to take some pictures in the garden the other day, before the frost kills all the little lovelies. After taking the pictures & upon reviewing them I thought "Hmmm there's something fishy about those snapdragons...but I just can't put my finger on it". :)

Tuesday, October 5, 2010

Perry Imitates Art


'Cluster Headache' by Kristen Tercek

Perry Imitating Art

I have long admired the artwork of Kristen Tercek of Cuddly Rigormorits. Her cute yet slightly dark style has me constantly checking her site for her new work. And when Shana Logic sells her prints I squee with delight! One of the prints Shana Logic is currently selling called 'Cluster Headache'-(pictured above, and if you remember I posted about it a couple of weeks ago)- was an instant favorite of mine, for duh reasons. It reminded me so much of my own creation, and fellow tomato pincushion, Perry, that I had to pay homage to the genius of Kristen Tercek with my own interpretation of 'Cluster Headache'. Perry is imitating art in these photos, and he loved it. The photo shoot was done in an old dollhouse of mine, Perry's choice of course, and was a lot of fun!

Saturday, October 2, 2010

Sauteed Veggies With Noodles

Like My Dill Garnish? :P
Here is another one of my Mom's uber yummy vegetarian dinner recipes. I loooove to make this dish! It's very easy to make, so good, and healthy too.

You'll Need-
  • 1 small Zucchini, sliced.
  • 1 can of quartered Artichoke Hearts, drained and chopped.
  • 1 carton of fresh Cremini or baby Portabella Mushrooms, sliced.
  • 1/4 of an Onion
  • Around 2 cups of a pasta of your choice, I used Rotini.
  • Water
  • Salt
  • Pepper
  • Parmesan Cheese
  • 1 tablespoon Butter
  • Extra Virgin Olive Oil
  • Around 1 tablespoon Red Wine Vinegar
  • Parsley flakes (optional)
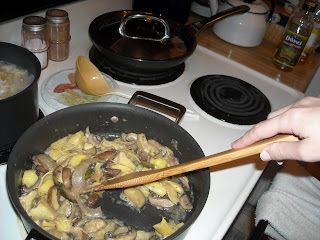
  1. Start by chopping your zucchini, onion, and mushrooms on a cutting board, then put them into a pan and saute them with about 2 tablespoons of Olive oil and a pinch of salt and pepper.
  2. Now that your mushys, onion, and zucchini's are sauteing, start boiling two cups of pasta, I used Rotini this time, but I have been known to use all sorts of noodles, including spaghetti.
  3. While your pasta is boiling open the can of artichoke hearts and drain the excess juice from the can, set them aside.
  4. Add about a tablespoon of red wine vinegar to the veggies, saute a little longer, and then add the artichoke hearts to the mix.
  5. Add the tablespoon of butter to the veggies.
  6. While the pasta is boiling add several spoons full of the pasta water to the sauteing vegetables to keep them nice and moist and create a little bit of sauce.
  7. Add grated Parmesan cheese to the mix now.
Once your pasta is aldente drain and add pasta to veggies, mix together and serve. You can add some more Parmesan when you serve. Also try making this dish with red bell pepper, fresh asparagus, or black olives, which are my personal favorite to add. Enjoy!